Introduction

This game was created as a school project within a team of 4 artists and 2 developers over a span of 8 weeks. We had to make a first-person puzzle game with a few conditions:

  1. The game must have 3 levels.
  2. Each level is referred to as a "cell" and must not exceed 20 meters in length, width, or height (20x20x20 meters).
  3. You must solve the first cell before advancing to the next. So you can't go from cell to cell without completing them.
  4. The game needs to have one mechanic that keeps coming back every level.

Here is the final product we created:

The Making of Starline

We made a whole dev commentary video containing 18 minutes of a full walk through of the game with commentary talking about why we made things and how. If you are really interested in this project and want to know everything I suggest you watch it. (Disclaimer: it is in Dutch)

Beginnings

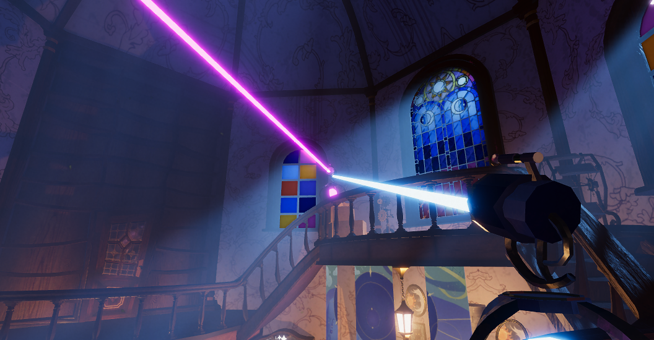
At first, we were really struggling with the puzzles we wanted to create, and we didn't have a clear idea of the main mechanic we wanted to incorporate. So we made a bunch of different puzzles with different mechanics, and I ended up making this laser prototype which you can see in the video:

As you can see in the video, the lasers react to mirrors and change colors if they are hit by other lasers.

The laser was created in two parts: the visual aspect and what happens behind the scenes. To make the laser function as intended, I utilized raycasting, as you can see in the code snippet below. Additionally, each laser was equipped with a LineRenderer, with its positions dynamically added through code.


	  public void CastRay(Vector3 pos, Vector3 dir, LineRenderer laser)
	  {
		LaserIndices.Add(pos);
	  
		Ray ray = new Ray(pos, dir);
		RaycastHit hit;
	  
		ChangeColor(CurrentColor);
	  
		if (Physics.Raycast(ray, out hit, 30, 1))
		{
		  CheckHit(hit, dir, laser);
		}
		else
		{
		  LaserIndices.Add(ray.GetPoint(30));
		  UpdateLaser();
		}
	  }
					  

The lasers mixing colors

Eventually, we decided that lasers would be the main mechanic for the game. But we would change the way you interact with the laser, so now you can go into the laser and control it like a camera. Since I made the laser, and it's kind of the bread and butter of our project, I will explain how everything works in more detail.

When a laser hits another laser, the colors start to mix. The code begins a function that takes both colors and returns the blended color. Then, the mixed color is given to a function called ChangeColor.


  if (colliderTag == "LightShooter")
  {
	CurrentColor = OriginalColor;
  
	ShootLazer shootLazer = colliderObject.GetComponentInChildren();
	shootLazer.Lazerbeam.m_mixColors = true;
  
	Color mixedColor = MixColors(CurrentColor, shootLazer.Lazerbeam.OriginalColor);
	shootLazer.Lazerbeam.ChangeColor(mixedColor);
  
	AddPointAndUpdateLaser(hitInfo.point);
  }
			  

ChangeColor Function Explained

The ChangeColor function plays a crucial role in our project and has evolved through multiple phases of development. Initially, I attempted to directly change the color of the line renderer and the laser to the blended color. However, this approach resulted in various issues and inconsistent behavior.

To resolve these problems, I introduced two variables called OriginalColor and CurrentColor. By carefully adjusting and fine-tuning the code, I was able to ensure that the function consistently and accurately performed its intended task.

Later, I received valuable feedback from a teacher who suggested that the colors were not distinct enough. To address this concern, I made further modifications to the code. I created a list of materials that our artist could customize to their preferences, allowing for more flexibility in color selection.

The code now dynamically selects the material that best matches the desired color for the laser by calculating the closest distance between colors. This ensures a more visually appealing and clearly distinguishable laser beam.


	public void ChangeColor(Color color)
	{
		Laser.colorGradient.alphaKeys[0].alpha = 1f;
		Laser.colorGradient.alphaKeys[1].alpha = 1f;
		CurrentColor = color;
		Laser.startColor = color;
		Laser.endColor = color;
	
		Material closestMaterial = null;
		float closestDistance = Mathf.Infinity;
	
		for (int i = 0; i < m_allMaterials.Count; i++)
		{
			Color materialColor = m_allMaterials[i].color;
			float distance = ColorDistance(color, materialColor);
	
			if (distance < closestDistance)
			{
				closestMaterial = m_allMaterials[i];
				closestDistance = distance;
			}
		}
	
		// Apply the closest material to the laser
		Laser.material = closestMaterial;
		m_lazerShooter.ChangeBallMaterial(Laser.material);
		m_lazerShooter.CheckCurrentColor(CurrentColor);
	}
							

The Laser Target

When the lasers hit the target, the HitChest function is called, and the color of the laser is passed as a parameter. That color is then added to a list called m_unlockedColor. Additionally, within this function, the emission and rotation of the indicator are adjusted to reflect the laser's impact on the target. However, I have excluded specific lines of code for simplicity.

Here's a visual representation of the laser hitting the target:

Laser hitting the target

public void HitChest(Color color)
{
  for (int i = 0; i < m_allColors.Count; i++)
  {
	float distance = ColorDistance(color, m_allColors[i]);
	if (distance <= m_poleData.ColourSimulairtyThreshold)
	{
	  if (!m_unlockedColor.Contains(m_allColors[i]))
	  {
		// Find the indicator with the corresponding color
		GameObject colorIndicator = m_colorIndicators.FirstOrDefault(indicator => ColorDistance(indicator.GetComponent().sharedMaterial.GetColor("_Color"), m_allColors[i]) <= m_poleData.ColorIndicatorThreshold);

		if (colorIndicator != null)
		{
		  // Code for adjusting the indicator's rotation and emission
		  // (excluded for simplicity)
		}
		m_unlockedColor.Add(m_allColors[i]);
	  }
	}
  }
}
				  

Achievement System

In our game, I have developed a comprehensive achievement system. I utilized the observer pattern to easily add various achievements to the game.

To handle the achievements, I implemented a Dictionary that executes specific actions when an achievement is unlocked.


private Dictionary m_achievementActionHandler;

private void Awake()
{
	m_achievementActionHandler = new Dictionary()
	{
	  { AllAchievements.ColorsMixed, () => HandleSingleAchievement(AllAchievements.ColorsMixed, "Colors mixing", m_colorsMixedIcon) },
	  { AllAchievements.Cell1Completed, () => HandleSingleAchievement(AllAchievements.Cell1Completed, "The beginnings!", m_cell1CompletedIcon) },
	  { AllAchievements.Cell2Completed, () => HandleSingleAchievement(AllAchievements.Cell2Completed, "Loop breaker!", m_cell2CompletedIcon) },
	  { AllAchievements.Bookworm, () => HandleCountAchievement(ref m_booksOpened, FindObjectsOfType().Count(), AllAchievements.Bookworm, "Bookworm!", m_bookWormIcon) },
	};
}
				  

By using the observer pattern and the Dictionary, I was able to easily define and manage various achievements. Each entry in the Dictionary corresponds to a specific achievement and its associated action.

For example, when the "ColorsMixed" achievement is unlocked, the "Colors mixing" message will be displayed along with the appropriate icon (m_colorsMixedIcon). Similarly, other achievements such as "Cell1Completed", "Cell2Completed", and "Bookworm" are handled in a similar manner.

Achievement Popups

Other Creations

Aside from the achievements system, I have also developed various other features and effects to enhance the gameplay experience. Here are a couple of examples:

Door Opened

I made a door for the second level

Text Font Effect

I added a cool effect for the UI

Discover Starline

So that's how Starline came to life! If you're intrigued by the game and want to experience it for yourself, you can download it now from our itch.io page.

Watch the Trailer

If you're still not convinced, take a moment to watch the awesome trailer created by our talented artists. It's sure to pique your interest!